
Sử dụng smart contract trong mạng etherum với web3js
Giả sử contract của chúng ta có nội dung thế này:
// SPDX-License-Identifier: MIT
pragma solidity >=0.4.22 <0.9.0;

contract Migrations {

    string public _message;
    uint public _last_completed_migration;

    function Hello() public{
        _message = "Hello World!";
    }

    function setCompleted(uint completed) public {
        _last_completed_migration = completed;
    }

    function message() public view returns(string memory) {
        return _message;
    }

    function lastCompletedMigration() public view returns (uint) {
        return _last_completed_migration;
    }
}
Và chúng ta đã deploy contract truffle ở lần trước rồi nhé.
- Để sử dụng smart contract cho mục đích cá nhân hoặc test chúng ta có thể sử dụng truffle console:
- 1. Chạy lệnh: <code>truffle console</code> cho mạng private hoặc <code>truffle console --network ropsten</code> (xem danh sách các network trong file <code>truffle-config.js</code>)
- 2. Chạy các lệnh sau trong console:
let contract = await Migrations.deployed()
contract.Hello()
contract.message()
- 3. Kết quả chúng ta nhận được: 'Hello World!'
- Tuy nhiên thường thì muốn làm ứng dụng để phục vụ cho nhiều người, trong đó có các ứng dụng web, chúng ta có thể sử dụng web3.js. Ở đây mình sẽ viết ứng dụng node.js chạy console cho đơn giản:
- 1 Khởi tạo project node js với file <code>package.json</code> thế này:
{
    "name": "eth-webb3js",
    "version": "1.0.0",
    "dependencies": {
        "fs": "0.0.1-security",
        "web3": "^1.6.0"
    },
    "scripts": {
        "start": "node main.js"
    }
}
- 2 Tạo file main.js thế này:
const Web3 = require('web3');
const fs = require('fs');

let provider = new Web3.providers.HttpProvider("http://localhost:8545/");
let web3 = new Web3(provider);
web3.eth.defaultAccount = "0xa9f6009507ef930c67b98f7a12cb0ca4321aaadb"; // change by your contract address not account address

let contractJson = fs.readFileSync("../truffle/build/contracts/Migrations.json").toString().trim();
let abi = JSON.parse(contractJson).abi;

web3.eth.personal.unlockAccount("0x3c31b4b9d6c24bad29498f99aaa6914231362c7f", "123", 600) // change by your account address
                 .then(console.log('Account unlocked!'));

let contract = new web3.eth.Contract(abi, web3.eth.defaultAccount);
contract.methods.Hello().call().then(console.log);
contract.methods.message().call().then(console.log);
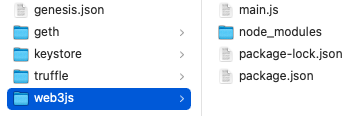
- 3 Sau khi setup xong, chúng ta sẽ có cấu trúc thư mục thế này:
- 4 Chạy lệnh <code>npm start</code> và chúng ta sẽ được kết quả thế này:
> node main.js

Account unlocked!
Result {}
Hello World!